In order to get progressive glasses adjusted properly, you need to look at them from all angles. In this article, we go step by step through the process to maximize vision and comfort.
First of all, we are speaking of progressive glasses that are already manufactured and we want to adjust the glasses to get the biggest fields of view out of it. Afterward, we will talk about new progressive lenses and about how to set things up to max out binocular fields of view.
Just Look at the Fitting of the Progressive Glasses and Gather Information
Before we are going to adjust anything on the glasses we will examine the glasses. Just look at the person wearing the glasses from the front, both sides, below the wearer, and from a position higher than him. Recognized were the pupils are and where the person is looking through. Just watch the distances from the upper frame to the pupils. Is it similar?
Look at the temples by pulling the ears slightly forward and also look behind the ears without touching the ears so you do not manipulate the position of the cartilage-tissue of the ear and with it the position of the glasses. Then have a closer look at the nose. How do the glasses fit here? Do we have a nice even landing of the nose pads? Or is the area of bearing not optimal of the angle.
Is the weight optimally distributed? Would the wearer benefit from a larger bearing, other materials, or a completely another frame? Can you change the materials or sizes of the nose pads? Does it make sense to mill parts of the frame? Now that we know how the glasses fit you need to ask the wearer if he has any issues with the lenses. Is there a pressure or some other discomfort that is produced by the glasses?
What is the wearer’s problem and in which situations does this problem occur. Does he have this problem day in and day out or does it come and go or is it occurring constantly? Vision, in general, has so many facets. With standardized questions, you can localize the needed adjustments better.
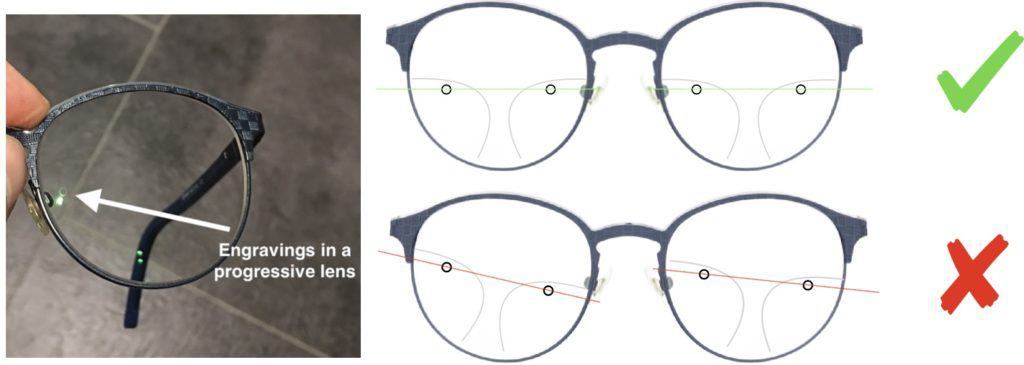
Now Mark the Engravings and Check the Centration
Let the person look into the distance and position yourself in front of him. Your eye that is looking at his eye has to be positioned directly in front of it. Do not look slightly from the left or right otherwise you will get a parallax error which will make the pupilar distance appear to be bigger or smaller. Now, look at the fitting cross you marked on the before. Does it sit directly in front of the pupil or does it sit a little left, right, above, or below the pupil?
Obviously, if the pupilar distance is out of the optimal place we can not do much except for making new lenses in order to make the vision better. But in some cases, a few adjustments can be made to establish more comfort and better vision. So let’s dive in to make you understand what we do.
Symmetry Is King When It Comes to Fitting Your Progressives
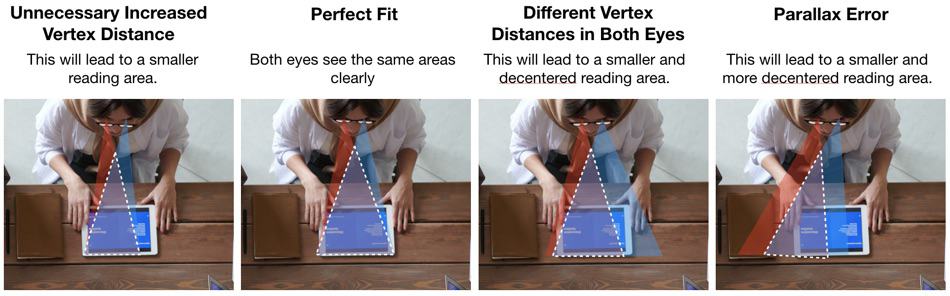
We always start in the middle of the frame. Sharp areas may vary if the lenses have different pantoscopic tilts. Because you are then looking through the lenses from two different angles. That can change the power of your progressive lenses in a huge way! Just look at the short clip below.
When the angles are made equal (most lenses are optimized to tilt at 8°). It is important to look at the distances of the lenses to the eyes (aka vertex distance). This distance also needs to be the same on both eyes. The reason is the blurry areas on the sides. If the lens is sitting with a smaller distance to the eyes the wearer will get a wider field of view. If it is sitting further away the bigger distance leads to a more narrow field of view.
A really good comparison is to try to look through a keyhole. The closer you can get with your eye the more you can see. If you decide to increase the distance with your eye and you are still looking through then a tiny little portion will be left of the whole picture. That is why I advise everyone to get their progressive lenses a little closer to their eyes. And of course, this should be considered when you are about to choose a new frame. The differences can be big.
The distance of the vertex can be manipulated with small adjustments by the temples to the middle part and on the ending part where it sits on the ears. In the picture below the differences between a perfect fit frame and the differences of the field of view to a not sp perfectly adjusted frame.
No Room for Tolerances – Adjustments for Progressives Need to Be as Perfect as Possible
Making Adjustments for New Progressive Glasses
First of all the refraction needs to optimal. I mean in most cases it is not checked how distance vision outside will do for the wearer. It can be tested indoors with e.g. green and red colors for example or you´ve could be taken outside to do the fine-tuning. But in most cases, you just get tested for the distance from you to the wall. Because there is the screen or their shines the projector.
I bet some of my colleagues will write me emails about it because actually, it will not make a difference because the distance is wide enough. But in practice for some wearers of progressive glasses, this makes a difference. In most cases, we are just speaking about a change -0,25D outside compared to indoor testing. But if you want to get rid of that slight blur over 20 meters and further away this is the adjustment that needs to be done.
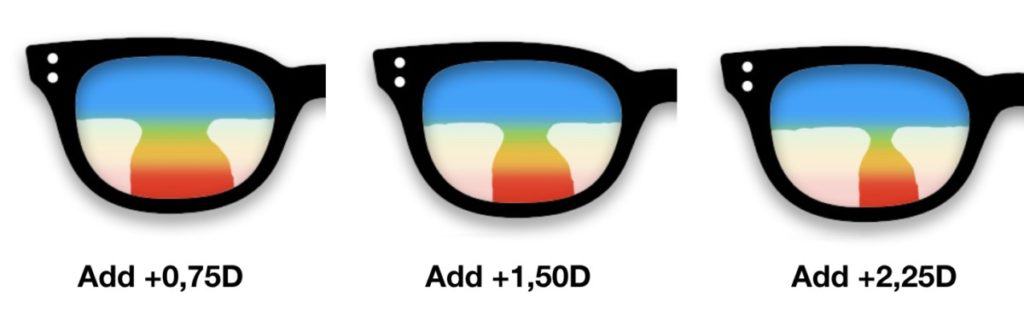
If you want to get the biggest fields of view you should not increase Add (reading power) too much. It should be set to a point where the wearer has the best possible vision. If it is increased further, blurry vision will also increase in the periphery and the reading area will definitely get smaller. So if it is not needed do not directly crank it up. Just look at the picture below.
The eye test and the changes with the lenses in the testing frame never represent the actual feeling you will have with progressive glasses. The reason lays in the different lens designs. During the eye test, you get single vision lenses in front of your eyes. If they are perfectly centered there are no side effects in terms of prismatic effects. If you perform eye movements with the testing frame those effects will come into play. That is what we normally do. We move our eyes around.
Now the progressive glasses got ordered and you get your new pair in front of your eyes. The fit is absolutely perfect. But what now happens is that the points where you looked through during the eyes exam (with single vision lenses) that gave you a certain perception of how sharp and comfortable you see moved from directly in front of your eyes 4mm under it.
This does not sound like a big deal but if lens power is different in the right and left lens that can lead to prismatic effects that will not be compensated by the wearer. There are different ways to approach this problem.
- Using a shorter progressive lens design
- Using prisms
- ordering a slab off (which places a thin line across the horizontal of one lens)
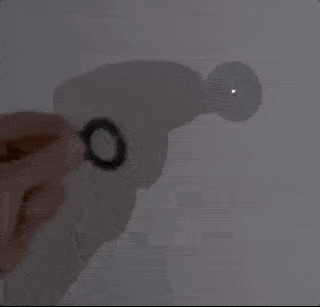
Some people describe this problem as bouncing pictures or they get headaches and can not accept the glasses. And if you think about it: THE PICTURE MUST JUMP. Just look at the short clip below.
So the perfect length needs to be chosen. And that depends on the prescription, the usage of laptop tablets, etc., and the wishes from the customer.
Adjustment of the Reading Areas in Progressive Glasses
Over the last 16 years, I measured parameters for thousands of progressive glasses. And I can tell you there is an unbelievable variety of different people’s faces out there. Every one of them has its unique angles and distances. For our adjustments know we stick with the:
- Vertex distance
- Pupilar distance for each eye separately
- pantoscopic tilt
- In which distance do you read?
If you want to look in the near range your eyes will move down and a little bit more nasal. As you are looking into the distance or near you are looking through different spots in the lens of your glasses. There are some progressive glasses that take this into account and some do not. As your pupilar distance is wider another adjustment would be made to place the reading areas in the correct spot compared to a person with a really narrow pupilar distance.
This perfect spot should be adjusted to another spot if your glasses sit nearer to your eyes or further away. If you look at progressive glasses from the side and they are heavily tilted or very straight in the face the manufacturer can include those four parameters (and some more). Because every one of them would have an effect on the right spot (which are oftentimes just 5-6mm) of the reading area. The following text will clear things up for you.
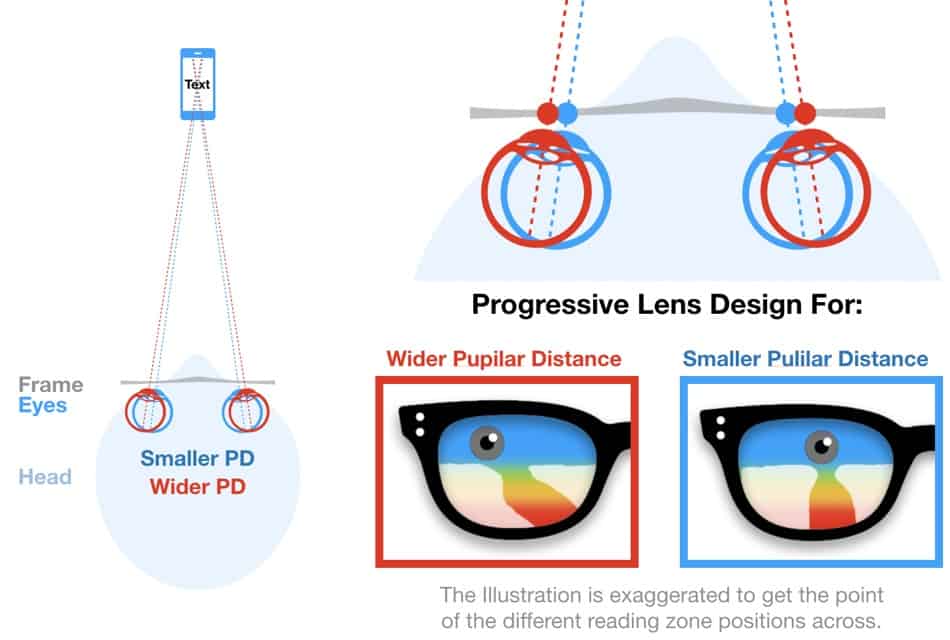
What you can see in the picture above is how a man viewed from the top looks at his mobile with a smaller and wider pupilar distance. Here you can see pretty easily that the wider pupilar distance and the smaller pupilar distance are looking from two different angles at the same near range object. That leads to different spots where the eyes look through the lens.
In short different spots where the man looks through lead to a changed lens design that fits the person’s parameters. The wider the pupilar distance gets the more the eyes need to converge to look into the same near range distance compared to someone with a smaller pupilar distance. This adjustment can be crucial. But it only makes sense when the reading distance is considered and how far the frame sits in front of the eyes of the wearer.

As you can see in the picture above if the frame sits further away or nearer to your eyes the perfect spot for you to read should be altered in its position. The lens can be just manufactured to one of the distances that are oftentimes 12mm if the vertex distance is not measured. But you will probably have only 5-6mm of really sharp vision so this should be taken into account. If this adjustment will not be made, usually in cheaper lenses or pure online retailers a decentered reading zone of 1mm easily happens.
Yeah, so what 1mm (0,0393701 inch). That is not that much i probably will be ok.
Customer that does not want the optimazation for the vertex distance
But if you know that a decentered lens of just 1mm combined with an Add Value of 2,50D (prevalent for people older than 60) will lead to approximately 20% less field of view while reading. You will lose a 30% field of view if the decentration will be 1,5mm! That can happen so quickly. That is why I am a big fan of video centration and photo centration devices. Taking a ruler and doing this kind of measurement just does not cut it.
Furthermore, the different distances from the frame to your eye can lead to another prescription in your glasses. Therefore lens power needs to be a little higher but for example, if you are nearsighted with -5,00 D (16mm in front of your eyes) and the new frame is 10mm in front of your eyes your prescription would change to -4,75 D to have the same effect. If it is not measured it will not be considered and you end up with a prescription that does not fit and a lens design that also is not the best for you.
This article covers a lot and what adjustments can be made in progressives. Nevertheless going more into detail would blow up this article too much. I wanted to show with easy to understand illustrations what should be done in most cases. Frankly, spoken recommendations can vary. There are a lot of adjustments that can be made, that does not mean they need to be made in every wearer of progressives. Sometimes it will not make a difference (If your parameters fall into the standard range) and sometimes little adjustments in progressives can lead to all the results you wanted.
")