In this article, you will learn how to measure prism in lensometers. Keep in mind you need to measure prisms in each lens separately but only the combination of prisms for both eyes will reveal the complete prismatic prescription built into the glasses.
In order to measure prism you need to know where the wearer of the glasses exactly looks through the lenses, this also known as centration of the lenses. First, we will start with single vision lenses and afterward, I describe how to measure prism in different lens designs like progressives or office lenses.
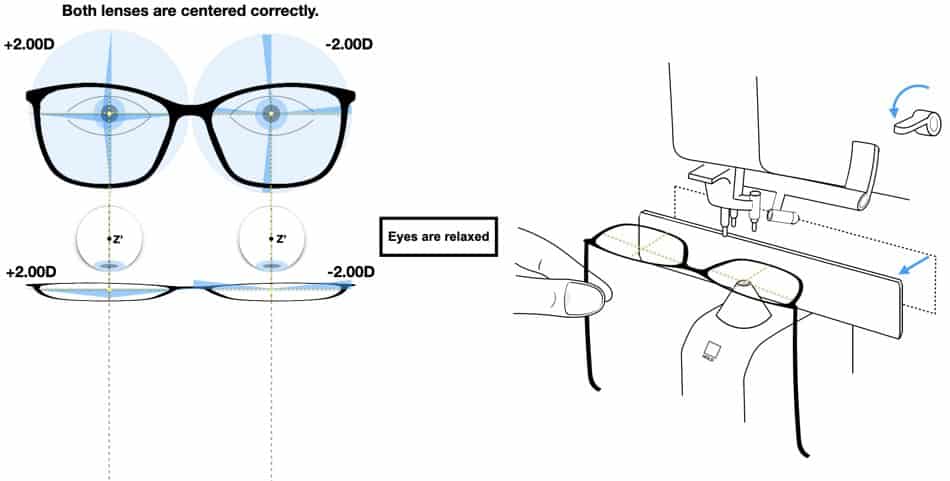
After you marked the centration on the lens and double-checked it by verifying the marking on the lenses by looking at the wearer you will place the marked spot on the lens right on the lens stop of the lensometer.
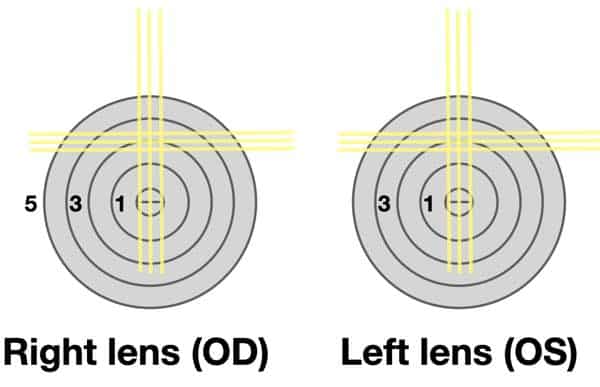
Here you can observe a deviation in regards to the yellow markings. When there is no deviation from the center there is no prismatic effect. When the marking is off-target prismatic effects can be measured. The more the marking deviates from the center the stronger the prismatic effect is. Usually, each ring around the center stands for 1pdpt or 1cm/m. The direction in which the deviation happens is influenced by the base of the prism which is the thickest part of the prism.
When the deviation of the marking in regards to the center on the scale is measured for both eyes in combination with the direction the values get combined. And the result is the prism or prismatic effect experienced by the wearer of the glasses.
I wrote “the prismatic effect can be measured” with intention. First, when you want to measure prisms in glasses the measured prescription needs always to be seen as a combination of both lenses for each eye. And second, the normal prescription also can change the effect of the prism actually measured in the testing frame. This becomes obvious to many wearers of progressive lenses and office lenses when they have anisometropia. But more on this later.
How to Measure Prism in Single Vision Lenses?
The following instructions are written for a manual lensometer.
- Mark the location of the wearer’s pupils while he/she looks straight ahead into the distance.
- Place the marked point exactly on the lens stop in the lensometer.
- Make sure the power wheel is adjusted to the lens power of the prescription.
- Turn the axis wheel to the correct cylinder axis.
- The Prism amount gets indicated by the numbered concentric circles on the reticle mires in which the illuminated markings get deviated.
- Now, look at the direction in which the illuminated target got shifted. This shows the base of the prism.
- Repeat those instructions for the other eye and then calculate the resultant prismatic effect the wearer of the glasses experiences.
With more modern autolensmeters less technical skill is required to measure the prism in ophthalmic lenses. But the person measuring the prism still needs to know where the wearer is looking through the glasses and which lens design is used.
The mentioned instructions work well with lower prisms. But when the prism which needs to be verified gets stronger than 6cm/m (or pdpt) the illuminated target gets deviated so much you can’t probably see it on the scale anymore looking inside the lensometer.
There are different ways to compensate for this. Some digital lensometers center the target directly in the middle of the scale (depending on which type is used and what options have been chosen).
Another option when a manual lensometer is used would be a compensating prism with the base oriented in the opposite direction compared to the prism in the glasses. This way the target gets shifted back on the scale. When a prism compensation device is built into the lensometer a knob is visible with adjustment options for the prism power and the orentation of the prism.
After the compensation device was used it always needs to be adjusted back to zero. Otherwise, the person using the lensometer will always measure an amount of prism where no prescribed prism is built in.
How Do You Test a Vertical Prism in a Lensometer?
When we talk about vertical prism it usually means the different lens powers in the right and left eye to produce images that shift differently. The position of the optical centers in relation to where the wearer looks through the lenses and the lens powers will determine the prism in the glasses. In order to measure vertical prism in a lensometer, you need to know where the person is looking through.
Please mark the exact position where the wearer of the glasses looks through the lenses. Second position the marked spot on the eyepiece of the lensometer. Now note down where the illuminated target is positioned. Repeat the process with the other side.
Now, look at the deviation of the illuminated targets of the left and right lenses. When the position of the target is up in one lens and down in the other the difference of both adds up. When on the other hand both sides show a deviation in the same direction the difference (amount of prism) gets smaller or even canceled.
For example, if you look at the pictures below you can see the illuminated target is deviated by the same amount up. Here no prismatic difference can be measured in the lensometer. Those vertically prismatic effects typically come up when single vision lenses have balanced lens powers but the centration is either too high or too low.
Another case where the deviation of the illuminated target can be measured is progressive lenses where prismatic effects are used to produce more aesthetically pleasing progressive lenses. Both of those vertical prisms are not critical to the wearer.
The important point here is to really check the points where the wearer of the lenses looks through. There is no point in just measuring the prism in the lenses when in reality the wearer has an eye that is a bit lower positioned compared to the other. Then the person checking the glasses just looking in the lensometer without checking where the wearer looks through the lenses could be satisfied with the picture below. It indicates there is no vertical prism.

This happens when glasses are quickly checked in the workshop. The table is set to a certain level to check the prescription and the prism. Afterward, the next lens gets checked at the table from the lensometer stays at the same height. I say this extensively here because it oftentimes does not get checked in optical shops. One example follows here. Before the refraction is done the prescription gets checked by an optician.
When the glasses are just taken to the lensometer without checking the actual centration the optician has no idea about how the lenses sit in front of the eyes.
Because almost no optician checks this before taking the glasses to check the prescription. But when the wearer of the glasses is already used to a vertical imbalance in the old glasses this probably would not get detected. The result would be adaptation issues with the new glasses. And no one knows why. Because one step for a correct checkup was skipped in the very beginning.
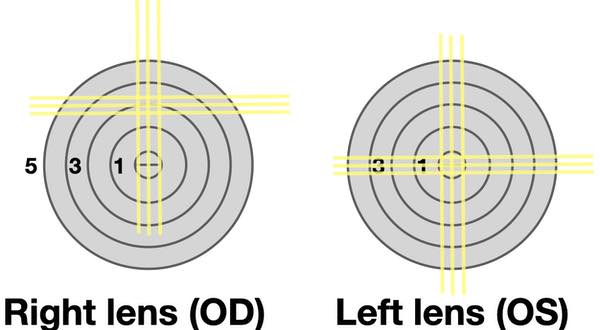
The next case shows a vertical prism. When the right and left illuminated target show such an imbalanced amount of prism in the left and right lens. This is how a vertical prism looks like in the lensometer.
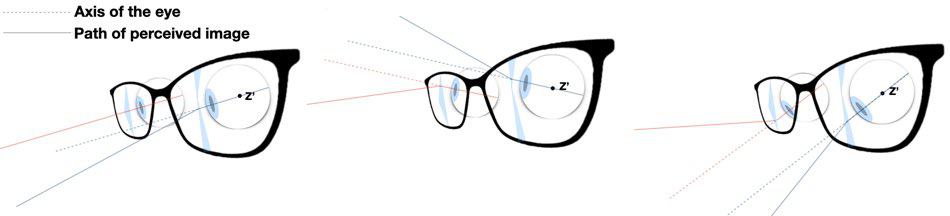
Always remember the measurements you made show prismatic effects in one position where the person is looking through. Due to the dynamics of our visual system, the wearer experiences a variety of prismatic effects depending on where the wearer wants to look through the lenses.
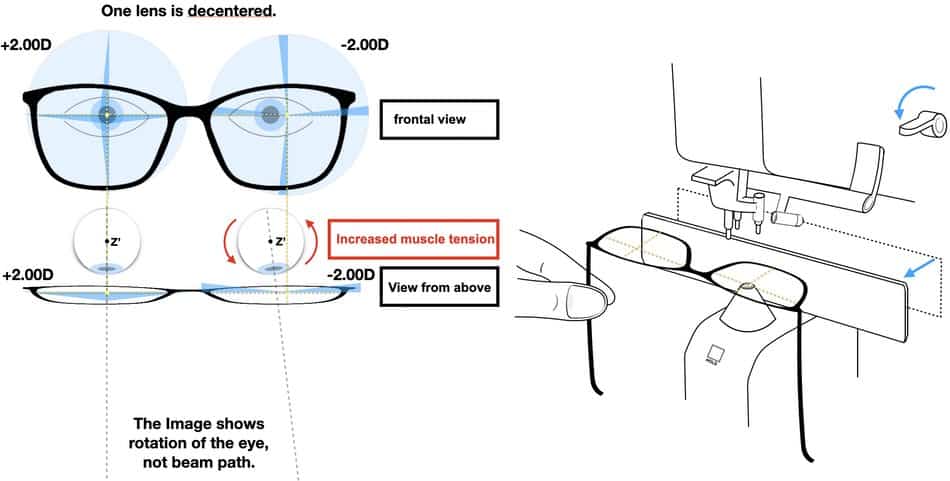
The pictures below show a minus lens in front of one eye and a plus lens in front of the other eye. As you can see in such an extreme case the deviation of the perceived pictures increases the more the eyes look up or down. This should be nothing new to you because the prentice rule describes just that and it is really common in an optical shop to see anisometropia (two different lens powers needed)
How to Measure Oblique Prism?
Oftentimes the orientation of the base is not 100% horizontal or vertical. Oftentimes a combination of both will show up. When measuring prisms in the lens meter the illuminated target gets shifted vertically up and down in combination with a horizontal component.
When this happens it works best to note down what you measured. This way the oblique prism can be easily split up into a horizontal, as well as a vertical component. In combination with the measurements for the other eye, the resultant prism becomes clear. Let us have a closer look at the example below. What you see looking at the illuminated target of the lensometer shows a shifted position of the target up and to the right.
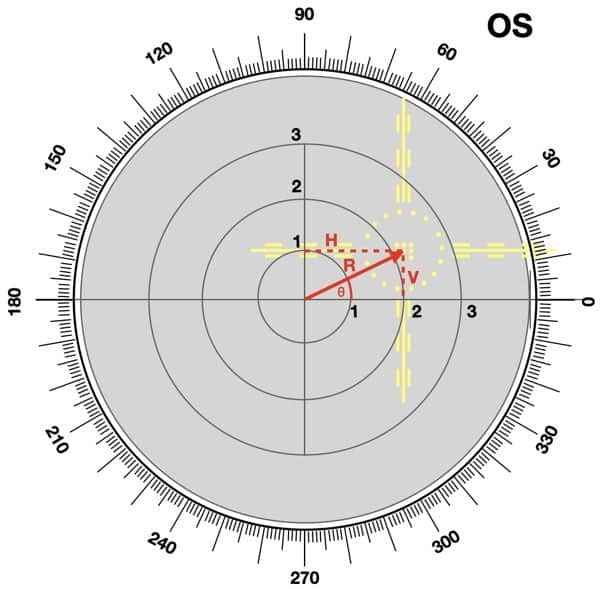
One of the ways to understand the measurements better is to write everything down in a grid and draw three lines.
1. Create a grid showing 0 degrees to 360 degrees. (Just like the one in the lensometer)
2. Which eye did you measure? The patient’s perspective is important here.
3. Now draw a line from the center to the middle of the illuminated target.
4. This is the resultant prism for this eye. Now we need to split it up into a horizontal and a vertical component.
5. Now draw a vertical line from the middle of the illuminated target down to the X-Axis and to the Y-Axis.
6. Read where the horizontal and vertical line intersects with the axis.
7. The vertical component reads 1cm/m B 90° while the horizontal reads 2cm/m B 0°
Now you have the prism amount and you can easily replicate the measured prescription in your testing frame.
With the single vision glasses, the person using them can work around anisometropia and the resultant prismatic imbalance. The wearer can simply just perform more head movements. But with multifocal glasses like progressives or office lenses you are forced to perform eye movements in order to use the different lens powers correctly. So in the following paragraphs, we will talk about how to measure prism in progressive lenses or office lenses.
How to Measure Prisms in Office Lenses?
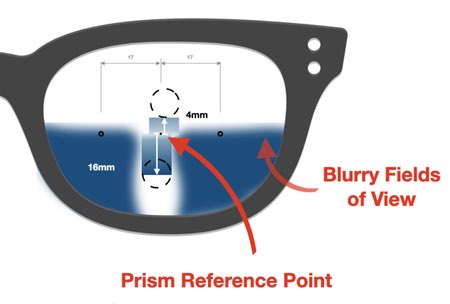
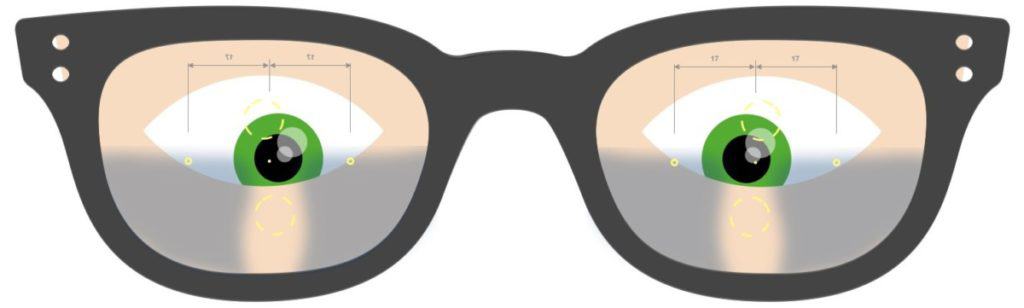
Office lenses have a distinct point where the lens should be measured with a lensometer in order to verify the prismatic prescription of the lens. It is called the prism reference point and lays right in the middle of the two circle laser markings you can see it in the picture below.
As you can see in the picture above in both lenses bigger circles with dashed lines are found in the upper and lower half of the lenses. In the upper circle, the optimal lens power is found for looking at the PC. When the wearer looks through the lower circles with dashed lines he or she gets maximum reading support. But the prism is verified in the middle of the lens where the wearer spends the least amount of time looking through the lens.
This topic was shortly mentioned at the beginning of this article. A lot of people need a lens power that is higher in one eye compared to the other. And of course, this produces a prismatic effect that could produce visual stress when the eyes look above the prism reference point or below it.
Depending on the office lens design chosen this stress can be reduced by the correct lens design. But what is most important is when problems come up the prism should be also measured in the areas where the wearer actually looks through the lenses.
The same rules apply to the measurements of the lenses as mentioned above. So you need to combine the prism from both lenses to get an idea about what the wearer experiences. But the verification of the prismatic prescription-only happens in the prism reference point.
Progressive Lenses and How To Verify Prisms
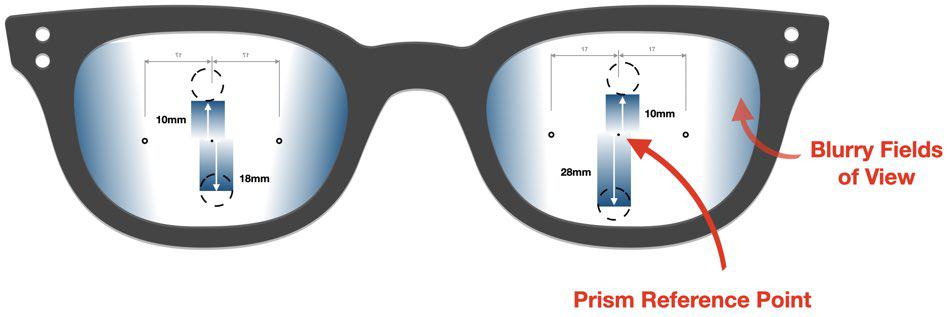
Prism in progressive lenses gets verified in the prism reference point. It is found right in the middle of the laser markings shown below in the picture. In this case, black circles can be seen in the picture. Depending on the manufacturer the symbol can vary.
The key here is to look for the same symbols mark them and use a verification mask to mark the prism reference point. Alternatively one can also search for the middle between the two laser markings. Because the PRP (Prism reference point always sits in the middle of the markings).
By placing the PRP exactly on the lens stop of the lens meter the prismatic part of the prescription can be verified. The interesting part here is the wearer of the progressive lenses will actually spend very little time looking through the PRP. Because in the PRP the field of view starts to be restricted in the periphery but the prescription is not clear for the distance nor for reading.
So the prescription in terms of the reading power is something in-between distance vision and reading power. The exact lens power is dependent on the Add value and the chosen progressive lens design. But now think about using a progressive lens while driving. The person driving looks through the lower part of the upper circle while driving.
In most cases, prescriptions have some difference in regards to the lens power for the left and right eye. When this happens the wearer will experience different prismatic effects than actually measured in the PRP when he does not look through the PRP.
Let me make my point a little clearer with an example. Let us assume there is actually no prismatic prescription needed. The person wearing the lenses has the following prescription:
| SPH | CYL | A | ADD | |
| R (OD) | -2.00 | -0.50 | 70° | 2.50 |
| L (OS) | -0.50 | -1.50 | 90° | 2.50 |
After the Add value, no prism is written down. So no prism is needed. And this is exactly the prismatic prescription when both PRP gets measured and the values get combined. But when the person uses the glasses for distance vision found (4mm) above the PRP the vertical prismatic component is 0.6 cm/m (BU) which is not critical. Looking down however the vertical prism increases due to the bigger distance the eyes move down in order to get the needed reading support.
How big this distance really is is dependent on the progressive corridor. Usually, a short progressive lens means the wearer needs to look 14mm below the PRP and in a long progressive corridor, the wearer needs to look 18mm below the corridor. Those values also change by a changed vertex distance but I do not want to get too technical here.
So when the person reads a lot how big would the prism be the eye muscles need to compensate for? The vertical component will be approximately as high as 1.50 cm/m BD in a progressive lens with a short corridor and more than 2cm/m in a long corridor.
This is a critical value because the acceptance for those progressive will decrease with a bigger vertical prism in the reading zone.
This is important because although we verified no prism in the PRP we need to compensate for the resultant prism looking through the lens with increased muscle tension. And in addition during the consultation, the optician or optometrist should recommend a shorter progressive lens design. Otherwise, adaptation issues are highly likely.
If headaches or adaptation problems come up with progressives this is an article I recommend to you.
This is it. That is my short summary about using a lensometer for the different lens designs to measure prism.
I wish you a great day.