This table below will serve you as a decision guide to easily pick your progressive lenses from Rodenstock. In this article, you will find in-depth information about each of the lens designs too.
| Impression Freesign 3 | Impression 2 | Multigressiv MyLife 2 | Progressiv Pure Life Free 2 | |
| Pupil Diameter | ✅ | ✅ | ||
| Main distance for near work | ✅ | ✅ | ||
| Reading distance during refraction | ✅ | ✅ | ||
| Optimized for your pupilar distance to maximize your field of view | ✅ | ✅ | ✅ | |
| Different Designs | Active, Allround, Expert | Active, Allround, Expert | ||
| Pantoscopic tilt | ✅ | ✅ | ||
| Vertex distance | ✅ | ✅ | ||
| Pupilar distance optimized for your prescription | ✅ | ✅ | ✅ | ✅ |
Impression Freesign 3
The Impression Freesign 3 from Rodenstock is a very high-end progressive lens model. It combines Rodenstock´s exclusive features like the DNEye PRO Technology to further enhance your field of view.
At the beginning of 2020, Rodenstock presented their Biometric Intelligent Glasses (B.I.G.) for their progressive lens lines to further fine-tune your vision. In short biometrical data is used to produce the best visual experience possible.
Rodenstock does this as the optician collects data about your eyes with the DNEye Scanner. Like how long are your eyes? How much lens power have your eye lenses and how deep is the anterior chamber of your eyes. Your pupilar size and the form of your cornea gets measured. They are really pushing the limits here to gather data about your eye. And that can enhance the way you see.
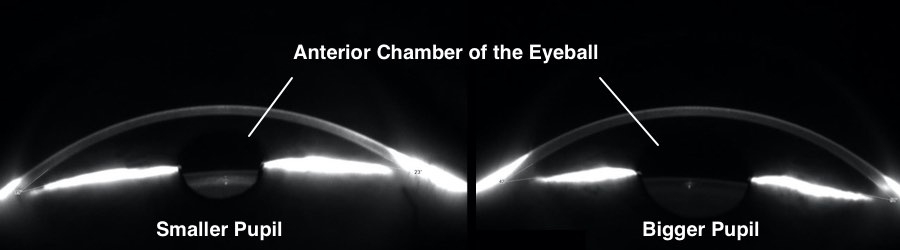
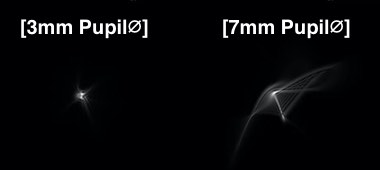
Here in the picture, you can see how the differences in the anterior part of two eyeballs. With the exact knowledge of your eye, Rodenstock can calculate how to manipulate the light that is passing your progressive lenses to give you the crispest picture possible (with glasses). Depending on how big your pupil is aberrations will change. Just look at the eye charts below.
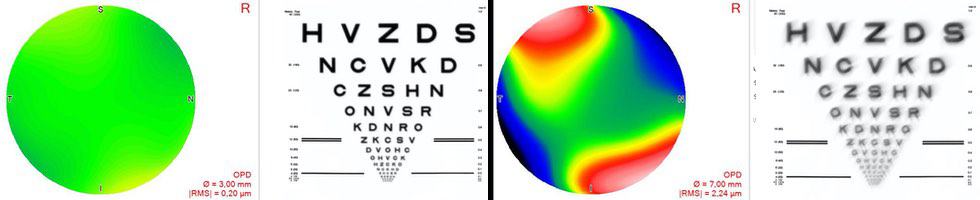
What you can see on the right side of the picture are blurry alphabetic characters. Because as the pupils are more open some people´s eyes will produce a less ideal picture. Double vision in one eye, cloudy vision, starbursts can be the results. And the Biometric Intelligent Glasses from Rodenstock can correct those effects to some extent.
I say to some extent because they are matching the surfaces of the front and back of your progressives to match the best to the surface and conditions of your eyes. That is great and it can work but not every aberration can be corrected with this approach.
And in addition to that, the lens design in front of your eyes had to change in order to still outperform the aberrations as you perform eye movements. Which is not possible. But the lenses could reduce effects like in the picture above.
Sorry for the rambling here about specifics but I think this information matters for a lot of people who need to decide what progressive lenses they buy. So, in short, the DNEye Pro technology I mentioned can enhance contrast and visual comfort. The results just depend on the conditions of the wearer’s eyes.
Furthermore, this lens design is an absolute masterpiece of engineering. You can order this progressive lens design even if the power of astigmatism changes for far and near vision. Which is unheard-of in the ophthalmic industry as you compare progressive lenses in more detail.
With the information about your visual needs in your daily life (main reading distance and working distance) and the number of parameters that can be customized for you this lens is a great choice for you if your Add value (reading power) is higher than +1,75D. The reason will be explained later in this article. In addition to that if you need higher lens powers this lens design could give you a wider field of view.
Impression 2
As you can see in the table above the Impression 2 lens design shares nearly all customization features with the Impression Freesign 3. The only things not available with this lens design is the DNEye PRO Technology I mentioned above and some special grinding specifics that might give you an edge if you are interested in huge frames.
The feature with the different astigmatisms for far and near vision is called personal eye model and also available with the Impression 2 and the Multigressiv lens designs. Despite this engineering feast, this progressive lens design here has all the possibilities to get modified to your visual needs. No matter how inclined the frame is or how it is wrapped around your face.

With Impression 2 you get the most out of a progressive lens. Extremely big fields of view. Fewer distortions on the sides compared to standardized progressive lens designs and therefore less swim effects. You can expect to get used to your progressives as easily as it can be with this lens design.
A lot of opticians are actually not aware that near astigmatism can play a huge role in the adaption process and visual comfort. Only a slight deviation from the needed prescription can minimize the field of view in progressives easily. According to a study from Anders Christin, from the Ernst Abbe Hochschule in Jena, 45% percent showed near astigmatism and a change in the axis with a minimum of 3°.
As far as I know, no other manufacturer is capable of combining the needed prescription for far and near vision as Rodenstock does. Especially when someone had a lot of trouble with past progressive lens fits this lens design is a valuable option that helped me out a lot in the last years in my shop.
Side note from me.
Multigressiv MyLife 2/ MyView
Herewith this progressive lens design you get a really good progressive lens design to provide you with a big field of view in the near zone. The reason how this is achieved comes from the custom position of the reading zones in the lower half of the lens (PD optimized Inset). This position is being automatically calculated in combination with how long the distance is between your eyes.
In a lot of cases, the mentioned custom positions for the reading zones are the biggest bang for your buck. But if the distances from your eye to the lens surface deviate a lot from the standard of 12mm your field of view will be minimized. The same is true for the parameters like the much the frame is tilted in front of your eyes or “wrapped” around your face. All these things will not be taken into consideration with this lens.
Usually, a few parameters are not exactly on point. No matter which frame you choose. That is why I expect the Multigressiv line up to deliver smaller reading zones compared to the Impression 2 and the Impression Freesign. I really like the option to configure the style of the lens design to your needs. The following has nothing to do with custom parameters.
The lens design itself can be ordered in three mods: Active, Allround, and Expert. The focus on the active mod is to give you more visual stability as you move your eyes and your head around. This mod will reduce swim effects and has a bigger distance zone and mid zones. In short, if you are a lot outside and your car´s dashboard or the laptop distance is important to you this will be a good choice.
Compared to the active mod the expert mod will give you a little bit more length in your progression corridor. Depending on the height of the frame it is 1mm up to 3mm longer. So with the expert mod, you will not only get more clear width to perform eye movements from left to right in the mid and reading distance but also up and down.
Generally speaking, this will give you more comfort as you often need to switch between different distances. In most cases, this will not compensate for a separate pair of reading glasses or a pair of glasses for PC work but it will make things easier if you do not want to rely so much on a second pair.
The “Allround” mod is obviously an approach between both already mentioned ones to balance the clear zones for you. Therefore the corridor length falls in between the middle of expert and active. If you do not want to choose between the three mods you can also Rodenstock decide which mix is best for you depending on your parameters. This is the default if no mod is ordered.
This type of configuration can also be ordered with the Rodenstock Impression line up. I really like this possibility to configure the lens design for my customers to ensure it fits their daily routines even more. So if your Add value is around 1,5 or 1,75D this lens design is great for you. But you also need to consider how the frame sits in your face and for example how tall you are. The reason will be explained later in this article.
Progressiv PureLife 2 / Progressiv PureLife Free
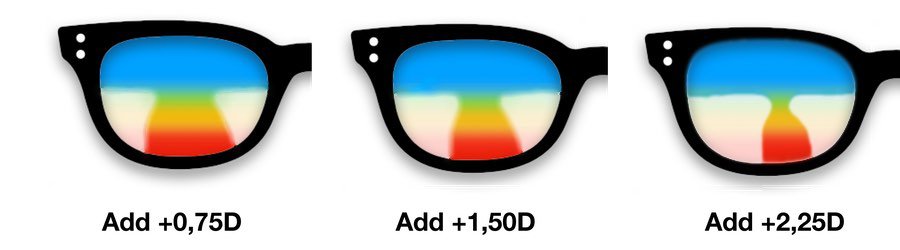
If you are more on a budget but still want to get the excellent coating tech from Rodenstock this progressive lens design is for you. With the “Progressiv” line up from Rodenstock, just your basic prescription and the data of the frame size can be taken into account. There is no customization possible here. The only thing that can be changed is the length of the corridor (not the design like the mods above).
A longer lens corridor will always give you a wider field of view in the mid-distance. But the tradeoff is you need to look down more in order to look through the reading zones. I recommend this lens only as you start out in your forties. The reason is according to Duane’s curve you need a lower reading power like 0,75D up to 1,5D. If this is true, you have automatically fewer distortions and a big field of view in the reading zones.

As time passes and you get older you will need more reading power (a higher Add value). Then it’s a good idea to move up to the more high-end lens designs to get the most out of your progressive lenses. All I described here are daily progressive lens designs that can be used for driving the car and seeing clearly outside.
However, oftentimes this is not enough to give you comfort while working with your PC. The support from the reading zones is just available as you perform eye movements down. With the following specialized progressive lens designs, you do not need to look down to get the support in near distances. But therefore you can not drive with them. They are just meant to be used as an addition to your normal progressives.
Rodenstock Progressive Lenses for PC Work
Ergo Line Up (Multigressiv Ergo, Impression Ergo, Impression Ergo FS)
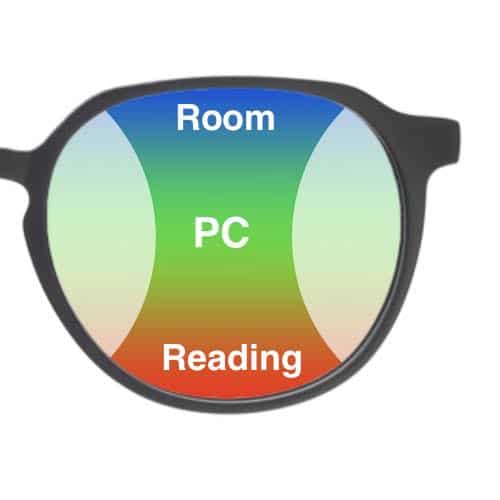
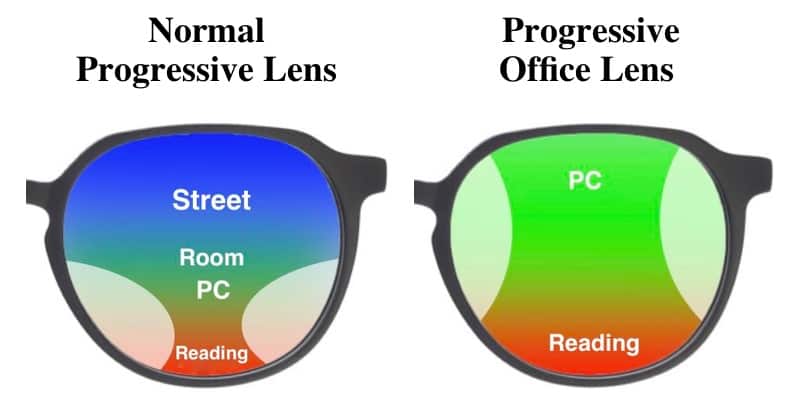
With all three mentioned lens designs in the Ergo line up, you can choose between three types “Book”, “PC”, and “Room” to enhance your vision at certain distances. If you choose the book design the progressive lenses would provide you the widest view from 35-60cm (depending on the Add value). However, the book option still lets you see clear up to 90 cm but the width of view will get smaller as you perform eye movements to the left and right.
In short, the Book design is the perfect option for you if your main focus is reading in close range or doing work at a closer distance. In the first moment, you might think that this progressive lens design might also work great doing PC work but this is not the case. It will require you to perform neck movements in order to see the lower half of your screen.
If you spend a long time during the day looking at your screen the PC option will relieve your neck and eyes of stress and leaving your posture. This lens has a little less width in the lower part of the lens for reading but gives you much more clear zones for the PC to perform eye movements from left to right as well as up and down.
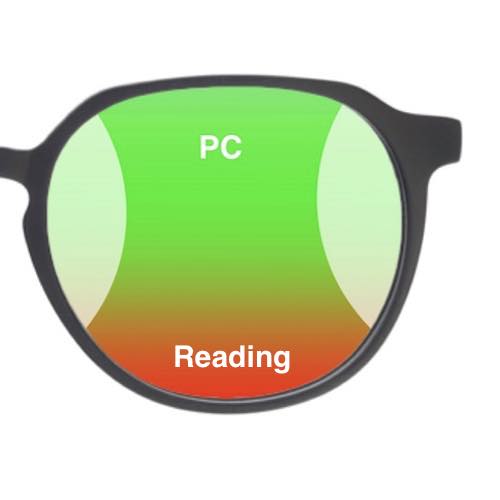
The PC options give you the ability to see clearly in 40cm in the lower half of the lens and up to 1,20m in the upper half. It gives you more distance to see clearly behind your PC Screen. It is really a great fit for people who do not need their PC progressives for presentations that require you to see a distance further away. Because after 1,20m your vision will get blurry.
Of course, this is always highly dependent on how much reading power you need. The chart above illustrates which distances you can see clearly in combination with which lens design and your Add value. If you already know you want to see clearly in a distance behind your screen you will need the room option. Just keep in mind the further your vision stays clear the fewer eye movements you can perform to the left and right with clear vision.
In short, the corridor of the lenses will lose width and you need to point your nose more into the direction you want to look at. For a lot of people, this is not an issue. But if you work with two screens on your desk it might be a wiser decision to stay with the PC option.
What Is the Difference Between Each Progressive Lens Designs in the Ergo Line Up?
The Impression designs are always top-notch designs with the most possibilities to individualize your lenses. The more data Rodenstock can comprehend the wider your field of view gets with your progressives and the more visual comfort you will experience. In short, this lens design is really customized to your needs and state of the art in the ophthalmic industry.
Compared to that the Multigressiv designs provide you with fewer features. Less data gets into the calculations for your lenses and therefore you will probably end up with a little less visual comfort and a slightly smaller clear field of view.
Generally speaking, this is even more important in daily progressives compared to computer progressives. The reason is the clear field of view in computer progressives is a lot bigger compared to your normal progressives. There is way less need for pointing your nose in the direction you want to see clearly.
The lower prized computer progressives from Rodenstock is the “Progressiv” Ergoline. Those lenses have no customization features. It is just the design and it does not matter if your eyes are quite apart from each other or if your pupillary distance is pretty small. The designs stay the same for both people.
This changes as you choose a higher quality lens design. The clear zones will be fitted perfectly to your needs. So you can adapt easier and faster.
Which Rodenstock Progressive Lens Is Best for Me?
Obviously, you could just go with the very high-end Impression progressive lenses to ensure you just get the best vision possible. The question oftentimes does it make a difference for you to choose one lens design over the other and which will give you the best run for your money.
In most cases, this is what my customers want to know. And this is exactly why I give you a few examples to give you a better understanding of which one to pick.
Side note by me.
Without having you in front of me I can only give you some insights for choosing your lenses. One general rule is for me as an optician is the higher your lens power needs to be the more aberration (blurriness in the periphery) you could experience. The same is true for reading power. It is also called Add value and it is low with a value of +1,00 and high when it is higher than +2,00D.
With a lower Add value, you will experience fewer distortions and blurriness on the sides in combination with a bigger field of view. Let us go on and talk about pupilar distances to make the picture complete. The ideal spot of the corridor (clear zones in the lower half of the lens) of each progressive lens design is dependent on your pupilar distance and your reading distance.
If you tried on different frames and would payed attention to how the frames sit in your face, you would realize distances and angles change with every new frame. One is a little more tilted than the other. The other frame sits a little closer in front of your eyes compared to the last one and so on.
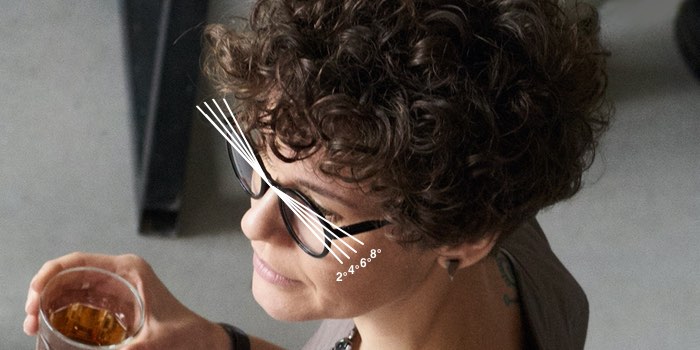
If you do not want to get the very high-end lenses the distance in which you hold your readings in front of your eyes will not get considered. This is only available with the Impression line from Rodenstock. Now, look at the picture below. What you can see are two eyes and different colored lines in front of the eyes. If your reading distance is bigger (because you are taller) the lines cross a little further away in front of you (like the green one).
If you like to read in a smaller distance closer to you (because you have shorter arms) the lines (pink and black) will cross closer in front of you. The gap in the thick blue line represents your reading zones in the progressive lenses.
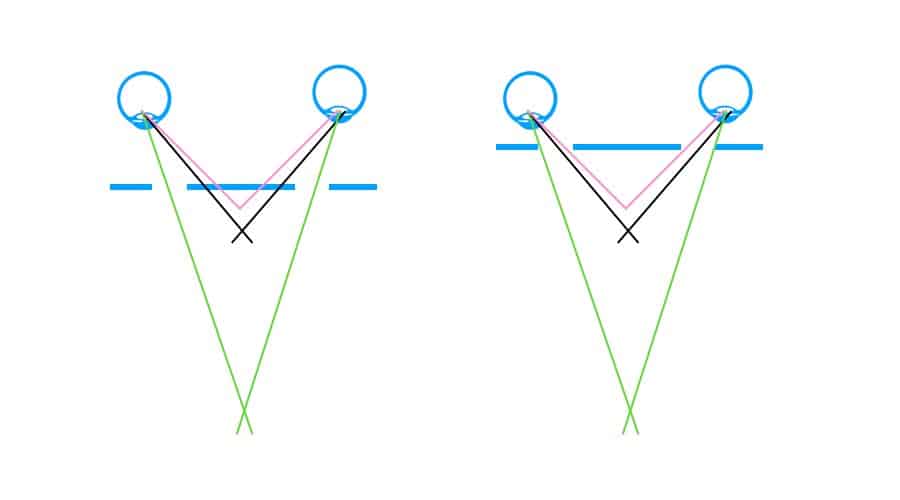
Only when the thin colored lines pass the gap in the middle your field of view will be maximized. Let us have a close look at the right side of the picture above. The thin black line just passes the gap just perfectly in the middle. A person that just looks through its progressives will tell you progressives are pretty good and it was quite easy to adapt to them.
But if someone looks through its progressives reading zones as with the green lines. He will tell you he can not perform eye movements what so ever. It is just not possible. And he is absolutely right because the green line passes the gap right at the end of each gap. There is just no space left to perform eye movements from side to side.
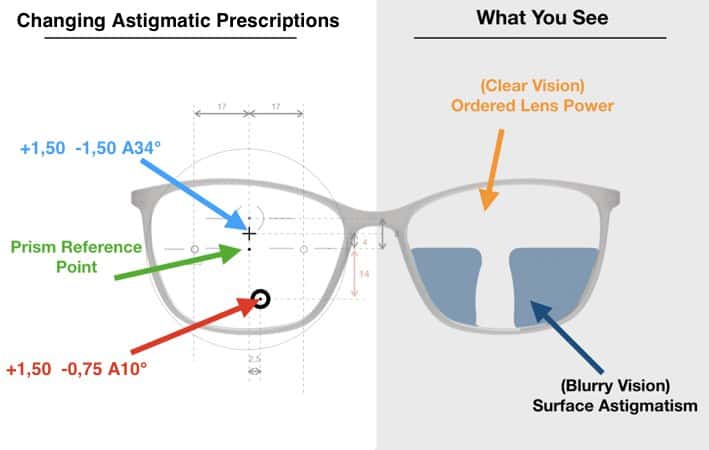
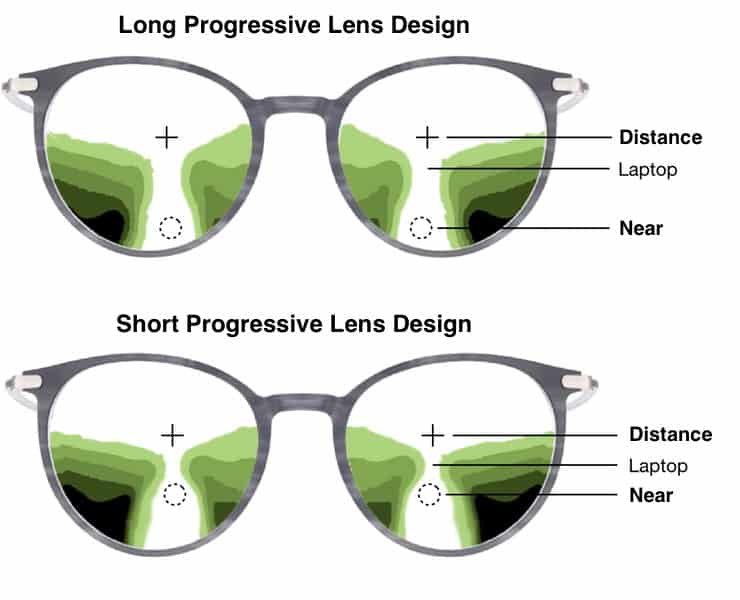
Just look at the picture down below. Here you will find on each side progressive glasses. Pay attention to the grey zones. They are distributed differently in the left glasses and in the right. Those represent blurry vision. If you look through the colored parts your vision stays clear. Now, look at the colored parts of the lower half of each lens. The “corridors” go down more straight on the right and more oblique on the left.
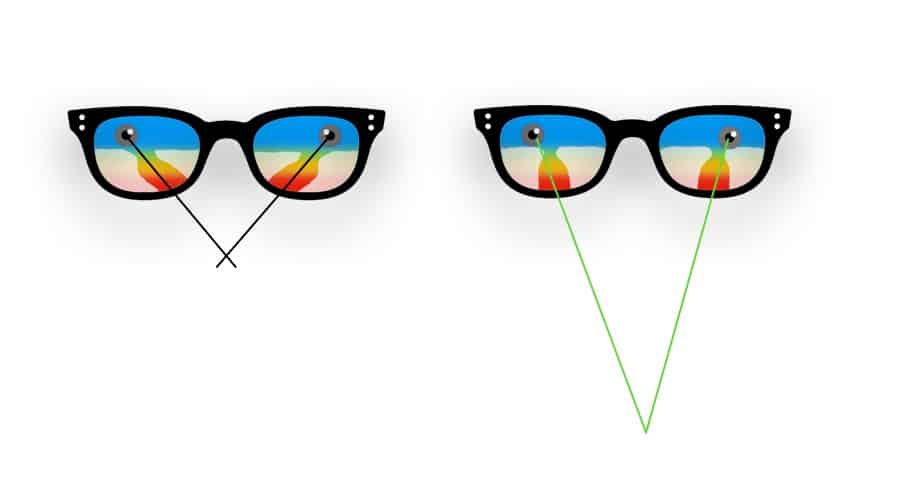
With the parameters of the working distance, vertex distance, and optimization where the reading zones should be placed in combination with your pupilar distance (inset optimized) the corridors will be individually made for you. And this is crucial if your Add value is higher than +2,00D.
Because as you can easily see in the picture above you just get a smaller corridor and more of the blurry zones with added reading power (Add value). That is why my recommendation will be more toward the Impression glasses to center the corridor just right in front of your eyes if the Add value is higher than +1,75D.
If reading power is lower than that you can get a pair of progressive glasses from the Multigressiv line. And you might be totally fine. Because with bigger corridors your zone to perform eye movements from side to side just gets bigger. That is the reason why people oftentimes tell you that their first progressives were their best progressives as they started in their 40s.
Having that said if your Add value is as low as 1,00D or 1,25D I personally would start out with the Progressiv Pure Life 2. With less reading power needed there is just less need for optimization. There are just smaller zones in which you can not see clearly and more in which you experience perfect vision.
Perfect vision stays sharp as you perform eye movements away from the center of the lens in lenses with fewer lens powers than +/- 2 diopters. However, this changes with higher lens powers. The more diopters you need the more blurriness you can experience in the periphery even in the upper half of the lenses.
That is why my recommendations change for people with a lower Add value of 1,00 but with hyperopia or myopia of 6D and higher. In such a case it is a great idea to go with the higher-end progressive lenses as they will give you oftentimes a lot more comfortable visual experiences. If you tilt your glasses a little bit with higher lens powers you can experience blurriness even in a single vision lens pretty quick.
You can compensate for those negative effects with higher-end lenses. In practice, a few people do not see or feel any differences as they switch from higher-end lenses to the lower-priced ones. The reason, in this case, is they coincidentally have the standard set of parameters if they wear a frame. The glasses sit at an average distance and angles. The pupilar distance is also an average of 32mm on both sides.
In such a case it can happen that you will not see any differences. But most people do experience differences. And especially when the lens power needed to be higher for you.
What Is the Rodenstock Traveler Service?
If your progressive glasses break Rodenstock will manufacture glasses for distance vision and reading to compensate for your broken progressives. You just need to fill your data in on Rodenstock.de and your journey can continue. After you returned home you can just give the two pairs of glasses back to your optician as soon as your Rodenstock progressives are repaired.
How Much Do Rodenstock’s Progressive Glasses Cost?
Every price shown in this table is a combination of one lens and the anti-reflective coating Solitaire Protect 2.
| Impression Freesign 3 | Impression 2 | Multigressiv MyLife 2 | Progressive Pure Life Free 2 | |
| 1,5 | 514€ | 510€ | 413€ | |
| 1,6 | 631€ | 541€ | 542€ | 434€ |
| 1,67 | 671€ | 588€ | 582€ | 474€ |
| 1,74 | 736€ | 650€ | 634€ | 546€ |
Why Are Rodenstock Lenses so Expensive?
Rodenstock progressive lenses are so expensive because of the amount of engineering that comes with it. The progressives from Rodenstock always inherit the newest innovation to customize the lenses to your needs. This will produce the widest view possible and of course, raises the costs.
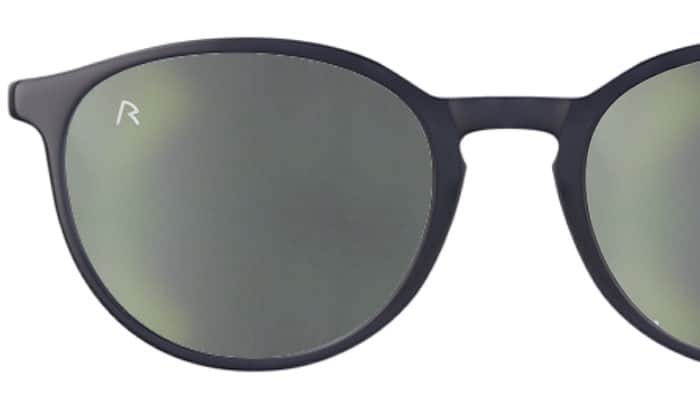
How to Identify Rodenstock Lenses
You can see pretty quickly if a lens is from Rodenstock. Just look at the upper part of the right lens near the temples. You can see an engraving of an R which is found on every lens from Rodenstock. Just have look at the picture below and you will spot the R on the upper left of the glasses.
Thank you so much for reading. I wish you a great day and I hope the information in this article makes it a little bit easier for you to pick your progressive lenses from Rodenstock.
