In this article, I will tell you who makes the best progressive lenses right now. In our comparison, I set some guidelines to make the comparison as fair as possible.
The progressive lens designs that performed best in our comparison were the following. They are listed in no particular order:
- Leica Varioid Volterra Continuum
- Zeiss Individual 2
- Rodenstock Impression Freesign Pro
- Seiko Brilliance
For you, some other aspects may be important compared to my focus during my tests so stick with me and read the whole article to get the complete idea of how I compared progressive lenses.
Every company is convinced they have the best progressive lenses on the market. No other company has this or that feature. This is what the marketing says. But I wanted to know if it was significant in real-world tests.
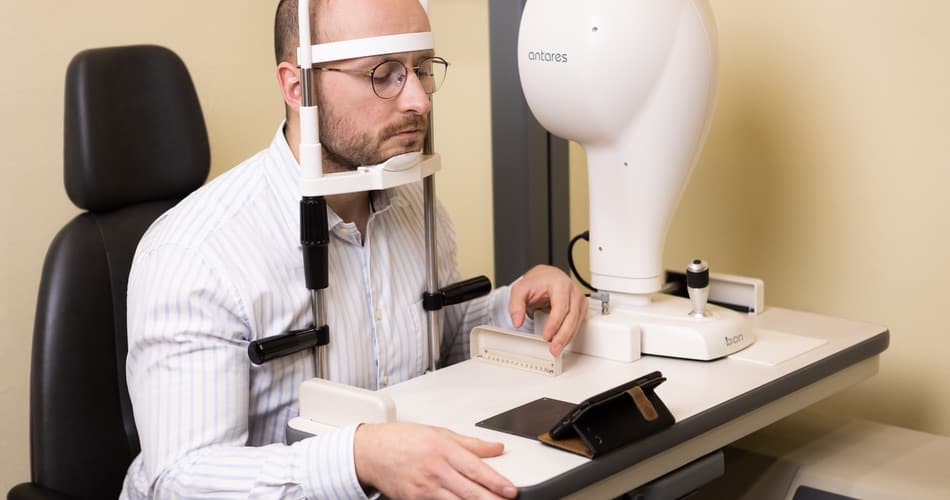
So I thought it would be a great idea to get a fixed test setting in which I can test different lens designs. Therefore I needed a few things:
- Fixed distance to test the width of the reading area
- Fixed distance to test the width of the field of view for mid-distance
- Fixed distance to test the width of the field of view for distance vision
- Every progressive lens need to fit in the same frame
- Every progressive lens needs to have the same Add value
First I thought this would cut it but I noticed a few things during the time I wore those lenses in my daily routines. The performance in terms of visual acuity varied in some of the progressive lenses more than others. This also varied depending on the environmental light conditions in which I wore the lenses.
Some of them produced color fringes which made the picture a bit less clear in sunny conditions. But in the room, everything was perfectly fine. I reported this to the sales reps and office work and received another pair of lenses but the color fringes stayed.
As the transition is a little different from far to near prescription with every progressive lens design the idea is not the best test setting to stick to a fixed test setting. Instead, I looked at my laptop and my mobile phone and moved them into the position where I had the biggest field of view.
Practically speaking this was just a slight movement of 2-3 inches back and forth but this way I can give you an idea of how wide the field of view is for me. Because some of the high-end lenses can be adjusted to a certain reading distance like the Zeiss individual 2 but the Shamir Autograph Intelligence can not. So I guessed the only fair comparison was to go into the most favorable reading position of each lens design.

This is exactly what I did for the normal reading distance and for the laptop mid-distance.
Otherwise, when I chose to compare the lenses in let’s say 18.5inches / 47cm in a fixed setting and some of the progressive designs just can not be adjusted to that distance I would compromise their clear field of view in that situation when in reality I just had to move the stuff I want to read like one or two inches back or forth to get the widest field of view.
Anyways, after you read this article you will have a better foundation in terms of your product knowledge and make better buying decisions in the future. You can get into the specific reviews to get more knowledge about each progressive lens design in my reviews. I linked those for you if you just click on the product names listed below.
First, in this article, I go through the technical comparison of the progressive lens designs. This includes the changes in the actual prescription and the position of the reading area (inset). After this, you will see the actual width of the clear field of view I experienced during the side-by-side comparison.
I also want to add a side note. During the test, I needed to decide by my own feeling when the peripheral blur set in. Every wearer of progressive lenses has a subjective tolerance to blurriness. Some people even go that far as to say they have no blur in the periphery with progressives. But what they oftentimes mean by this statement is they can actually still read. Although this is far from every stretch of my imagination of a clear picture.
The next paragraphs will make clearer what I just described.
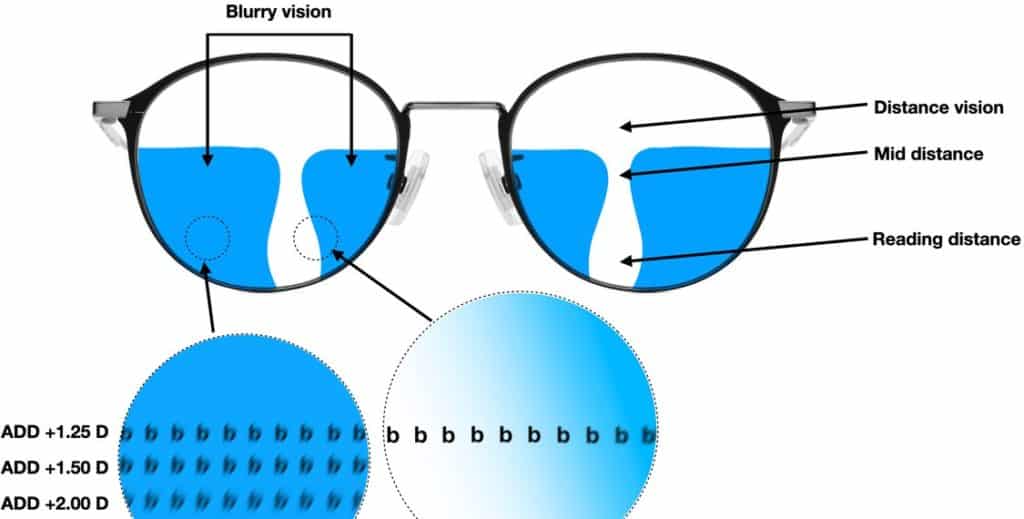
Just look at the picture below. In the right bubble underneath the glasses, the blur is illustrated which I experienced during the comparison. What you can see is the character b multiple times. But each of the characters is slightly more blurry the more you observe the characters positioned in the blue zone.
I noted down the areas that were crisp and clear to me. But again look at the line with the b where would you decide where the blurry zone begins? Long story short: A lot in this comparison is subjective here. Keep this in mind.
Which Progressive Lenses Did I Compare?
In this test I compared the following progressive lenses side by side:
- Essilor Varilux X
- Hoya Hoyalux ID Myself
- Leica Varioid Volterra Continuum
- Novacel Eden Alpha
- Rodenstock Impression Freesign 3
- Shamir Autograph Intelligence
- Zeiss Individual 2
- Seiko Brilliance
Every one of these lenses should be set to a corridor length of 15mm. In most cases this was possible. In some cases, the design selectors (software to order the lenses) did their thing because only then did the potential of the lenses fully unfold for the subjective tests in which I wore them daily. This order process oftentimes influences the length of the corridor. (This happened with the manufacturers’ Hoya and Seiko)
So to be transparent here if you deal with products of different companies you will always find some variation in terms of the options to order. The idea here is to make the progressive lenses as comparable as possible. I can already see my e-mail inbox blowing up. But whatever back to the test.

To get consistent results we ordered the lenses with the following parameters and fitted them to the same frame.
| Pupilar Distance right | 34,2 |
| Pupilar Distance left | 30,7 |
| Height | 25 mm |
| Pantoscopic tilt | 9° |
| Wrap Angle | 5° |
| Vertex Distance | 11 mm |
Those parameters are nothing special. I just wanted to have a frame that sits pretty average in my face.
One Thing That Surprised Me With the Progressive Lenses in Comparison
I never thought the position of the reading area (this is the inset) would differ so much from manufacturer to manufacturer. What this parameter describes is the optimal position of your reading zone. It is dependent on:
- Your pupilar distance
- The distance between your eye and the lens`s back surface
- Reading distance (the nearer the more your eyes converge)
Although there were quite some differences in the positions the actual field of view was let’s say “similar”. The parameter Inset is shown in the picture below.
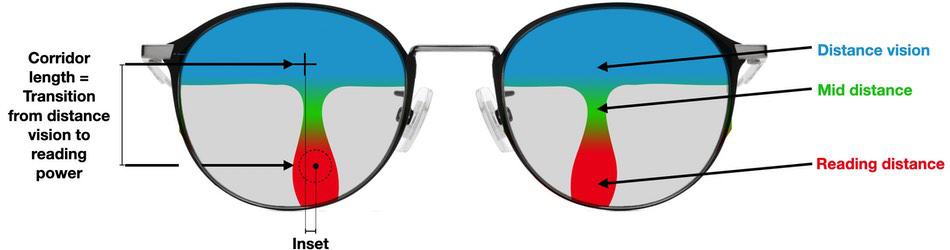
Different Insets in comparison
| Inset | Right INSET | Left INSET |
| Essilor Varilux X | 2.9 mm | 2.5 mm |
| Leica Varioid Volterra Continuum | 2. 5mm | 2.5 mm |
| Novacel Eden Alpha | 2.5 mm | 2.5 mm |
| Shamir Autograph Intelligence | 2.5 mm | 2.5 mm |
| Hoya Hoyalux ID Myself | 2.6 mm | 2.5 mm |
| Rodenstock Impression Freesign 3 | 2.2 mm | 2.0 mm |
| Zeiss Individual 2 | 2.1 mm | 1.8 mm |
Different RX
Every manufacturer of progressive lenses has its own unique formulas to produce progressive lenses. This also means your prescription from the testing frame will be slightly changed to fit the position of wear in your progressive lenses. What gets changed by this approach you ask?
Everything! Every component of your RX usually gets slightly changed in order to produce optimal visual results. In my opinion, some of the manufacturers sometimes go too far with their optimizations. Especially when the Add value gets lowered. There are two different reasons why the manufacturers do the change in reading power.
- optimizing the lens power to the position of wear.
- making the clear field of view wider, which implies you need to extend your arms a little more in order to see clearly. Because less reading power equals a wider field of view.
| RX Comparisons (Right Lens only) | SPH | CYL | A | Add |
| Essilor Varilux X | +0,06 | -0,02 | 82 | 1,72 |
| Shamir Autograph Intelligence | +0,01 | -0,01 | 154 | 1,94 |
| Leica Varioid Volterra Continuum | +0,06 | -0,04 | 105 | 1,98 |
| Hoya Hoyalux ID Myself | +0,04 | -0,04 | 101 | 2,00 |
| Rodenstock Impression Freesign 3 | -0,02 | -0,07 | 163 | 2,00 |
| Zeiss Individual 2 | -0,04 | -0,04 | 180 | 1.93 |
Comparing the Field of View of Progressive Lenses
Here we are at the most wanted comparison. Which of the tested progressive lenses has the widest field of view. Therefore I looked at my laptop display and my mobile phone and marked the areas I saw clearly and where the blur set in. The blurry parts of my field of view are marked in blue color. The clear areas are not marked with colors.
Here in the picture below you can see one of the pictures. There are several of them. I made you a download link here to all pictures in a PDF or by clicking directly on the picture below. In the upper right of each picture, you can see a red outlined box. This box tells you if the picture you are looking at illustrates my mobile phone or my laptop.

In the middle of the picture, in the upper white space, you can see the specific lens design that was tested. By scrolling through the pictures in the PDF you will realize the similarities when it comes to the field of view. In some cases, the field of view also was a little shifted to the sides which obviously is not the optimal position for the clear parts of the lenses.
All the lenses were made with the same data I sent to the manufacturers. Different measurements in regards to the centration and your needed lens power will lead to another field of view. If you want to know more about it and how the field of view can be manipulated I have another article here for you.
When it comes to the actual clear field of view and the change in the prescription those things are pretty easy to compare. Where I really struggled to compare all the progressive lenses are found in the following section of the article.
When Straight Objects Seem Round While Looking Through Progressive Lenses
I also wanted to directly compare how each progressive lens alters the shape of stairs for example. Usually, this perception will not be noticed anymore after a few days or weeks with your progressives. But for some people, I thought this could matter. So I looked at the stairs, switched the progressive lenses again and again until I practically did not see any real changes.
Every progressive lens out there will produce a magnifying effect in the lower half of lenses so you can read. This produces the side effects of the slightly altered shape of straight lines. But comparing this was not really possible.
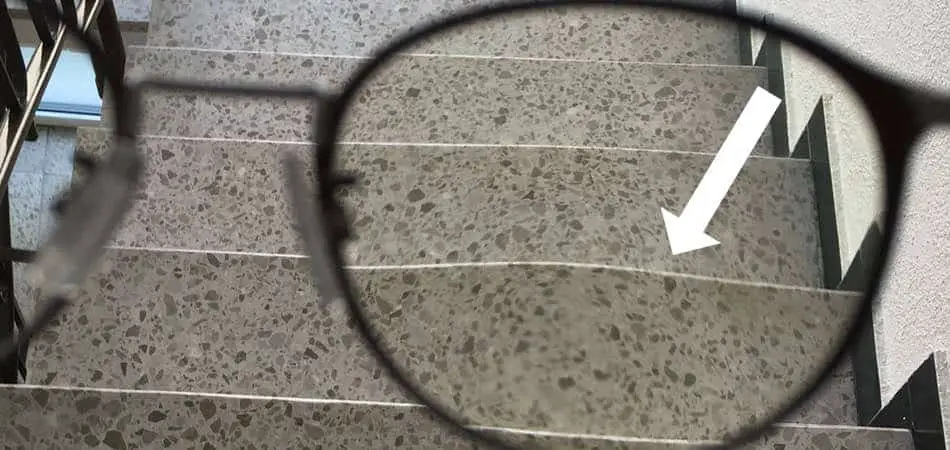
Here in the picture above, I made a photo for you to make the altered shape of the stairs visible.
Comparing the Blurry Fields of View in Progressive Lenses
First I thought it would be nice to know where the differences are when I look through the different progressive lenses in a fixed askew way through the lower half of the lenses. I thought maybe I could identify a lens type that enables me to see clearer compared to the other progressive lens designs. This way I thought you might be able to see clearer in the worst part of the lenses.
This assumption was false. I tried to find differences looking through the blurry fields of view. But it turned out the amount of blurriness looking through the lens in a askew way was almost if not identical through out the whole line up of progressive lenses.
When you look through the lenses and you start in the optimal position reading everything is clear obisously. When you stay focused on a certain character and simultaneously rotate your head from side to side you will notice the blur in the periphery. The more you look through the lenses in an askew way the blurrier it gets.
First, you will notice slight blurriness then the character will get a shadow-like effect until the character seems to be there two times. This shadow, the double effect was so similar. I could not identify differences by looking through the lenses.
Color Fringes With the Best Progressive Lenses – Some Showed Them More Dominant
The lenses here tested are the very best lenses on the market right now writing this article. One thing that bothered me was color fringes. In bright sunny days when I looked at the edge of an object, I saw a blue or yellow outline around this object.
This was present with the following lenses:
- Essilor Varilux X 4D
- Zeiss Individual 2
- Hoya Hoyalux ID Myself
Frankly spoken very very few customers of mine reported this issue to me in my optical store. I guess most people can not see it or they do not care about the slight chromatic aberration. I also did not have this minor issue inside. It only came up outside and only there in bright sunlight.
If you want to read more about color fringes related to glasses I have another article here ready for you.
But Now Definitely Ones and for All Who Makes the Best Progressive Lenses?
The best lenses in my experience are the following:
- Leica Varioid Volterra Continuum
- Zeiss Individual 2
- Rodenstock Impression Freesign Pro
- Seiko Brilliance
Depending on where you live not all of the progressive lenses might be available to you. To say this or this progressive lens design is the best performing for you without having done all the measurements is no statement you can count on.
For example, this test is heavily influenced by my experience wearing these lenses. Here in the list above, I did not mention the Hoya Hoyalux ID Myself. But I have customers who prefer this lens design over the ones from Zeiss or Leica. And this oftentimes can have something to do with one feature that is unique to the manufacturer like the binocular harmonization technology from Hoya.
Another great feature that is very unique is the optimization of astigmatism in the area of distance vision compared to another prescribed astigmatism in the reading space. We had great success in fitting those lens designs from Rodenstock for example or OptoVision.
OptoVision is another manufacturer which I also like a lot but I have not included them in the list because they do not ship to the US (and most of my readers live in the states) and I have a major contract with them and wanted to present my opinion as unbiased as possible here.
So in short getting, the best progressive lenses are far more dependent on the optician. If he works thoroughly knows his craft and likes to work with people you will get the best progressive lenses possible.
Forget about the manufacturers. As you saw in the comparison PDF above the actual width in regards to the clear field of view is definitely comparable. I can not say there is this one progressive lens design out there that is lightyears ahead of its competition.
Every of the progressive lens designs mentioned above has a feature set that is bound to the manufacturer. I do have those details like the different coatings also listed in the summaries about the manufacturer’s progressive lens line up which you can find here.
Conclusion Having Tested the Best Progressive Lenses
That is it. This is my take on the best progressive lenses and comparing them was fun. I wanted to make this comparison for years. I actually wanted to include a test where we would compare the field of view for distance vision.
Because what you oftentimes see when you buy progressive lenses are pictures that tell you in the upper half of the lens everything will be crystal clear from the left side of the frame to the right side of the frame. When in reality some blur will also there be noticeable if you are very sensitive to it.
This is not a big issue every lens had and comparing them side by side in my opinion would not make much sense because the transition from totally clear to a minimal blur is way less visible compared to the lower half of the lenses.
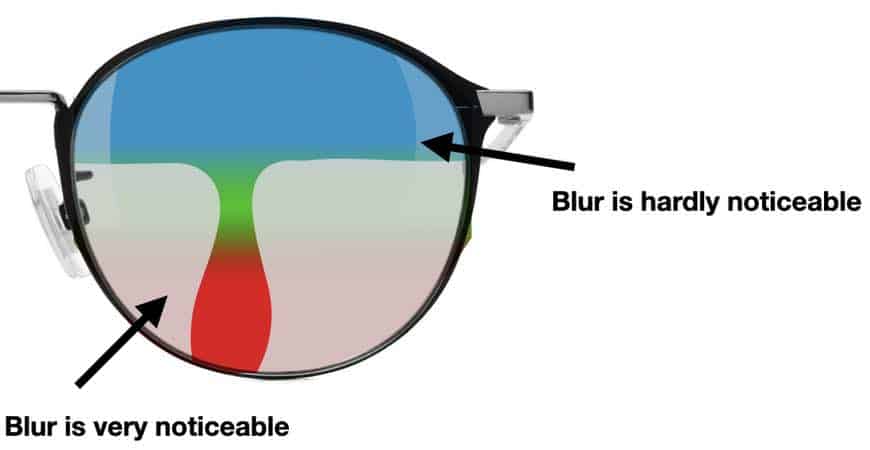
The picture above shows you with a grey overlay where I had the blurry areas. This is totally normal because when your eye rotates to the side optical errors increase. So a slight blur has to come up.
I hope you found the information about progressive lenses you were looking for.
I wish you a great day.